Mountain environments present some of the most challenging and rewarding experiences nature has to offer, yet they demand thorough preparation and unwavering respect for their inherent dangers. Whether you’re planning to tackle iconic peaks like Mount Kilimanjaro, navigate technical alpine routes, or simply enjoy a weekend hiking adventure, proper preparation can mean the difference between a life-changing experience and a dangerous ordeal. The mountains don’t forgive poor planning, inadequate equipment, or overestimation of one’s abilities.
From the moment you lace up your boots to the triumphant moment you reach your destination, every aspect of your mountain journey requires careful consideration. The harsh reality is that mountain environments combine altitude effects, unpredictable weather patterns, technical terrain challenges, and limited rescue access into a formidable test of human preparation and resilience. Success in these environments isn’t just about physical fitness—it requires a comprehensive understanding of gear systems, risk assessment, nutrition strategies, and emergency protocols that could save your life when conditions deteriorate rapidly.
Physical conditioning and altitude acclimatisation protocols
Physical preparation forms the cornerstone of successful mountain travel, yet many adventurers underestimate the comprehensive conditioning required for high-altitude environments. Your cardiovascular system faces unprecedented demands when oxygen levels drop significantly above 2,500 metres, where each breath contains roughly 26% less oxygen than at sea level. This physiological challenge requires months of dedicated preparation, not weeks of casual training.
Cardiovascular training regimens for High-Altitude performance
Effective cardiovascular preparation involves progressively building your aerobic base through sustained, moderate-intensity activities that mirror mountain demands. Running, cycling, and hiking with weighted packs should comprise the majority of your training volume, with sessions lasting between 45 minutes to 3 hours depending on your target expedition duration. The key lies in training your heart to pump efficiently at lower oxygen saturation levels, which requires consistent aerobic stress over extended periods.
Research indicates that individuals who maintain training heart rates between 120-140 beats per minute for extended periods develop superior oxygen utilisation efficiency. This translates directly to better performance when atmospheric pressure drops at elevation. Consider incorporating stair climbing, incline treadmill work, and long hiking sessions with elevation gains exceeding 500 metres to simulate the sustained cardiovascular demands you’ll face on actual mountain routes.
VO2 max enhancement through hypoxic training methods
VO2 max, your body’s maximum oxygen consumption rate, serves as a critical predictor of high-altitude performance. Training masks and altitude simulation chambers can provide some benefit, though they don’t fully replicate the physiological stress of actual elevation. More effective approaches include high-intensity interval training sessions that push your cardiovascular system beyond its comfort zone, forcing adaptations that improve oxygen delivery efficiency.
Elite mountaineers often employ hypoxic training protocols that combine reduced oxygen environments with structured exercise regimens. While expensive altitude chambers aren’t accessible to most adventurers, you can achieve similar adaptations through breath-holding exercises during cardio sessions and training at the highest elevations available in your region. These methods stimulate increased red blood cell production and enhance your body’s ability to extract oxygen from thinner air.
Progressive altitude exposure scheduling for everest base camp and denali expeditions
Acclimatisation scheduling becomes critically important for expeditions above 4,000 metres, where altitude sickness can strike even well-conditioned athletes. The golden rule of “climb high, sleep low” applies to most multi-day mountain adventures, allowing your body to adapt gradually to reduced oxygen levels while maintaining recovery at lower elevations during rest periods.
Professional expedition leaders recommend spending at least two nights between 2,500-3,500 metres before ascending to higher elevations, with additional acclimatisation stops every 600 metres of elevation gain above 3,000 metres.
For major expeditions like Everest Base Camp or Denali, your acclimatisation schedule should span 2-3 weeks minimum, with carefully planned rest days and contingency time for weather delays. This isn’t just about preventing altitude sickness—proper acclimatisation enhances your enjoyment, performance, and safety margins throughout the entire expedition.
<h3
Respiratory muscle strengthening exercises using PowerLung trainers
While most people focus on legs and lungs for mountain fitness, the specific respiratory muscles you use for breathing under load often get overlooked. Devices like PowerLung trainers or similar inspiratory muscle trainers add adjustable resistance as you inhale and exhale, effectively turning breathing into strength training. Over 4–6 weeks, this targeted work can increase respiratory endurance, reduce the sensation of breathlessness, and delay fatigue on long climbs at altitude.
A typical protocol involves two sessions per day, five days per week, with 2–3 sets of 10–15 resisted breaths per set. You start at a low resistance and progress gradually as breathing becomes easier, similar to adding weight on a barbell. For best results on high-altitude treks like Everest Base Camp, begin respiratory muscle training at least six weeks before departure and combine it with your regular cardiovascular training to mimic the stress you’ll face in thin air.
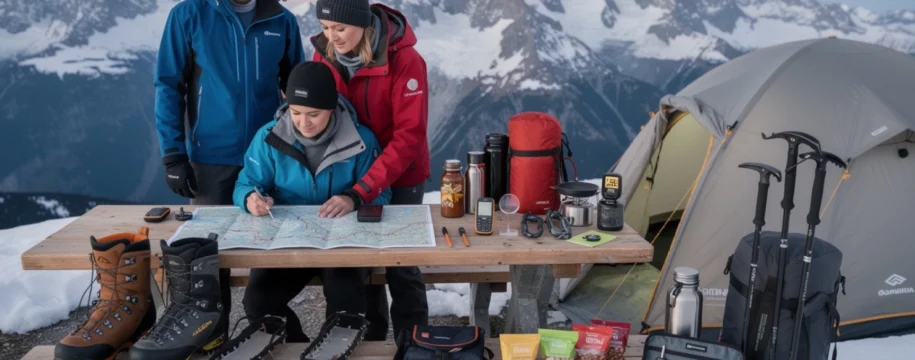
Technical gear selection and mountain-specific equipment systems
Even the best physical conditioning cannot compensate for poor gear choices in a harsh mountain environment. Technical equipment is your life-support system when temperatures plummet, winds accelerate, and terrain becomes unforgiving. Selecting the right mountain clothing, boots, crampons, and navigation tools is not about chasing the latest gear trends; it’s about building an integrated system where every piece works together to manage moisture, heat, and safety.
Before you invest in expensive mountaineering equipment, define your objective: are you trekking to a mountain hut, climbing 6,000-metre peaks, or attempting winter ascents in the Alps? Each scenario requires different specifications for insulation, weather resistance, and technical performance. A well-designed system keeps you warm without overheating on the climb, dry in driving snow or rain, and protected when you are exposed on ridges for hours at a time.
Layering systems: merino wool base layers and Gore-Tex shell integration
An effective layering system is the foundation of safe and comfortable mountain travel. At its core, you are managing three things: moisture, insulation, and protection from wind and precipitation. Merino wool base layers excel at moisture management and odour control, wicking sweat away from your skin while still insulating when damp—an invaluable property when you are sweating on steep ascents and then stopping in cold air on exposed summits. Unlike pure synthetic fabrics, high-quality merino blends can be worn for multiple days without developing strong odours, which is ideal on multi-day expeditions with limited washing facilities.
On top of your base layer sits a mid-layer (fleece or light synthetic insulation) and then a waterproof, breathable shell. Gore-Tex or equivalent membranes provide a robust balance between weather protection and breathability, especially in heavy snow or prolonged rain. The key is integration: your shell must have enough venting options (pit zips, mesh pockets) to release excess heat without letting in water, and it should fit comfortably over your insulation layers without compressing them. Think of your layering system as a thermostat you can adjust throughout the day—if you’re constantly too hot or too cold, the system needs refining.
Mountaineering boot selection: scarpa mont blanc vs la sportiva nepal cube GTX
Choosing mountaineering boots is one of the most critical decisions you’ll make before a serious mountain trip. Models like the Scarpa Mont Blanc and La Sportiva Nepal Cube GTX are benchmark boots for technical alpinism, but they suit slightly different needs. The Scarpa Mont Blanc is a robust, traditional leather and synthetic hybrid boot known for durability, warmth, and solid edging on mixed terrain. It’s a strong choice for classic alpine routes in the Alps or Andes where you’ll encounter ice, snow, and rocky sections over several days.
The La Sportiva Nepal Cube GTX is designed to be lighter and more responsive, with advanced insulation and a slightly more precise fit. Many climbers favour it for technical ice and mixed routes where sensitivity and weight savings matter. Both boots are fully crampon compatible (B3 rating in European terminology), but you should prioritise fit above brand: different manufacturers use different “lasts” (foot shapes), and a boot that doesn’t match your foot will cause blisters and black toenails on long descents. Whenever possible, try boots with the socks you plan to wear and test them on an incline or staircase before committing.
Crampon compatibility and binding systems for technical alpine routes
Crampons are only as safe as their compatibility with your boots. For technical alpine routes, you’ll generally choose between semi-automatic and automatic bindings, both designed for B2 or B3-rated boots with appropriate welts. Automatic crampons (with front and rear bails) offer very secure attachment and precision on steep ice, but they require stiff boots with a pronounced front and rear welt. Semi-automatic systems (rear bail, front strap) are slightly more forgiving and can fit a broader range of mountaineering boots while still offering high performance.
Equally important is choosing the right crampon design for your objective. Horizontal front points work well for glacier travel and moderate snow slopes, whereas vertical front points bite better into hard ice and mixed terrain. Before any serious ascent, practise fitting, adjusting, and walking in your crampons on easy ground—many accidents occur because straps loosen, anti-balling plates fail, or climbers trip due to poor technique. Treat crampon compatibility as a non-negotiable safety criterion rather than an afterthought in your gear list.
Navigation equipment: garmin InReach vs spot X satellite communicators
Modern mountain navigation goes beyond paper maps and compasses, especially on remote routes where mobile coverage is unreliable. Satellite communicators like Garmin InReach and Spot X provide GPS tracking, two-way messaging, and SOS capabilities that connect you with global rescue networks. Garmin InReach devices integrate closely with mapping software and smartphones, allowing you to send detailed location updates and coordinate changes via two-way text over the Iridium satellite network. This makes them particularly valuable on complex, multi-day expeditions where plans may need to change on the fly.
Spot X also offers two-way messaging and SOS features, but often at a slightly lower entry cost, making it appealing for trekkers who need essential communication rather than deep integration with navigation apps. When choosing between these systems, consider subscription costs, coverage maps, user interface, and battery life in cold conditions. Regardless of your choice, a satellite communicator should complement—never replace—traditional navigation tools. You should still carry a map, compass, and a fully charged GPS unit or smartphone with offline maps for redundancy.
Emergency shelter systems: bivy sacks and four-season tent specifications
In the mountains, shelter is more than a comfort—it’s a critical layer of protection against hypothermia, wind exposure, and sudden storms. For fast-and-light objectives or emergency backup, a high-quality bivy sack can provide minimalist protection with minimal weight. Modern bivy designs use breathable, waterproof fabrics and integrated hoods that shield you from precipitation while reducing condensation build-up. They are ideal as an emergency fallback even if you are planning to stay in huts or guided camps, because plans can change quickly with weather or injury.
For planned overnight stays in severe conditions, a four-season tent remains the gold standard. Look for strong pole structures (often crossing in multiple points), robust guy lines, full-coverage rainfly designs, and snow flaps for winter expeditions. A good four-season tent balances storm resistance with adequate ventilation to minimise condensation, which can freeze on the inner walls at night. When you evaluate tent specifications, don’t just look at weight—consider wind resistance, ease of pitching in bad weather, and interior space for storing gear and melting snow. In an emergency, your shelter might be the only barrier between you and life-threatening exposure.
Weather pattern analysis and route-specific risk assessment
Understanding mountain weather is a core skill for anyone travelling at altitude. Forecast apps are useful, but they often lack the granularity and local nuance you need on complex terrain. The combination of steep topography, rapidly moving air masses, and fluctuating temperatures creates microclimates that can turn a benign-looking forecast into a dangerous reality. Learning to interpret orographic effects, avalanche bulletins, thunderstorm risks, and wind chill is as essential as knowing how to swing an ice axe.
Before stepping onto any serious mountain route, you should analyse both large-scale weather patterns and route-specific hazards. This means checking regional forecasts from reliable meteorological services, reading local avalanche reports, and talking with guides, rangers, or hut wardens familiar with current conditions. Ask yourself: how will this specific route behave under strong winds, heavy snow, or afternoon thunderstorms? If you don’t have satisfying answers, you may not be ready to commit safely.
Orographic precipitation patterns in the european alps and rocky mountains
Orographic precipitation occurs when moist air masses are forced upward over mountain ranges, cooling and condensing into clouds and precipitation. In practical terms, this means that the windward sides of the European Alps and Rocky Mountains often receive far more rain and snow than the leeward sides, which can be drier and sunnier. For example, prevailing westerly winds in the Alps bring heavy snowfall to regions like Chamonix and the Bernese Oberland, while eastern valleys may experience comparatively lighter precipitation under the same synoptic pattern.
For trekkers and climbers, recognising these patterns helps you anticipate where storms may build and which passes or ridges will be most exposed. A route that seems straightforward on the map might funnel moist air into a narrow valley, creating persistent fog and rain, while a neighbouring ridge remains relatively clear. Think of the mountains as giant weather factories: as air is lifted, cooled, and wrung out like a sponge, you get rapid changes in visibility, snowpack, and avalanche risk. Using orographic knowledge, you can choose safer itineraries and adjust start times to avoid the worst of afternoon build-ups.
Avalanche risk evaluation using AIARE level 1 protocols
For any winter or spring travel in snowy mountains, avalanche awareness is non-negotiable. The AIARE Level 1 framework (or equivalent in your region) provides a structured approach to evaluating avalanche risk and making conservative decisions. It emphasises three pillars: interpreting avalanche bulletins, observing conditions in the field, and managing group travel techniques. Rather than relying solely on your intuition, you learn to identify red flags such as recent avalanches, signs of wind loading, rapid warming, and “whumpfing” sounds indicating collapsing weak layers in the snowpack.
Even if you are not a backcountry skier, these protocols matter on snow-covered trekking routes and glacier crossings. You should know how to read the local avalanche forecast, understand the danger rating scale, and relate it to slope angle and aspect on your route. Carrying avalanche safety equipment—transceiver, shovel, and probe—is essential when travel intersects avalanche terrain, but tools alone are not enough. The real safety margin comes from route choices: avoiding loaded slopes, spreading out the group on suspect terrain, and turning back when multiple warning signs align. In avalanche country, a “maybe” should usually be treated as a “no.”
Lightning strike risk assessment above tree line elevations
Lightning is an often underestimated hazard on summer mountain trips, particularly above the tree line where you are the tallest object on an exposed ridge. Thunderstorms can develop with alarming speed due to convection and orographic lift, especially in the Rockies and high alpine regions of the Alps. Any time you hear distant thunder or see rapidly building cumulus clouds in the afternoon, you should reassess your position and escape options. A high summit or knife-edge ridge is the last place you want to be when a storm cell moves in.
To reduce lightning risk, plan early starts so that you are off exposed terrain before typical afternoon storm cycles peak. If you are caught in a storm with no immediate shelter, descend quickly from ridges to lower ground, avoiding isolated trees, metal objects, and watercourses. Spread your group out by several metres and adopt a low lightning position if strikes are imminent—crouched on your pack or an insulating pad with feet together. While uncomfortable, this posture can reduce the current path through your body compared with standing upright. The best defence, however, remains proactive route timing and continuous sky monitoring.
Wind chill factor calculations for exposed ridge traverses
Strong winds can transform a mild temperature into a dangerously cold environment, especially on exposed ridges and summits. Wind chill represents the perceived temperature on human skin when wind accelerates heat loss, and it is a key factor in hypothermia risk at altitude. For example, an ambient temperature of -5°C with a 40 km/h wind can feel closer to -15°C, particularly if you are sweaty or inadequately dressed. On technical traverses where you may be moving slowly and stopping frequently, this effect compounds over time.
Before tackling any high, exposed route, check forecasted wind speeds at your target elevation—not just at valley level. Use wind chill charts or calculator apps to estimate how cold it will feel and adjust your clothing system accordingly. This might mean adding an extra insulation layer, carrying a balaclava and goggles, or reconsidering your objective altogether. If you find that you cannot keep your hands warm even with good gloves, or your speech becomes slurred and coordination deteriorates, these are early signs of cold stress that demand immediate action. In mountain travel, wind is often the invisible element that turns a borderline decision into a serious hazard.
Nutrition strategies and hydration management at elevation
Your body becomes a high-output engine in the mountains, burning through calories and fluids far faster than in everyday life. At altitude, increased breathing rates cause additional fluid loss through respiration, while cold air often blunts your natural thirst response. The result? Many otherwise well-prepared climbers and trekkers find themselves dehydrated and under-fuelled just when they need energy the most. A deliberate nutrition and hydration plan is essential for sustained performance and for reducing the risk of altitude-related headaches and fatigue.
As a baseline, aim for 3–4 litres of fluid per day on demanding mountain days, combining water, electrolyte solutions, and hot drinks where possible. Carrying a hydration bladder makes it easier to sip regularly while moving, but always back it up with a hard bottle in case hoses freeze. For nutrition, focus on easily digestible, carbohydrate-rich foods you actually enjoy eating when tired: trail mix, energy bars, sandwiches, dried fruit, and simple sweets. At higher altitude, fat and protein digestion can slow, so think of your intake as a steady trickle of “quick energy” rather than a few heavy meals.
Planning ahead makes a big difference. Pre-pack snacks into small portions (one per hour of movement is a useful rule of thumb) so you don’t have to think about it when you are cold or fatigued. Breakfast and evening meals should be substantial but not overwhelming—oat-based breakfasts, soups, pasta, rice dishes, and freeze-dried meals all work well. Consider adding electrolyte tablets to at least one bottle per day to replace sodium and other minerals lost through sweat, especially in hot, sunny conditions at high altitude. If you notice dark urine, persistent headaches, or an unusual drop in energy, treat it as a hydration and fuelling problem first and adjust your intake before assuming the worst.
Emergency response planning and wilderness first aid protocols
Mountain environments are inherently remote, and professional help can be hours away even in popular regions. This reality makes personal preparedness and group self-sufficiency crucial. A solid emergency response plan starts long before you step onto the trail: sharing your itinerary with a trusted contact, understanding local emergency numbers, and knowing whether helicopter rescue is available in your area. You should also honestly assess your wilderness first aid skills—could you stabilise a sprained ankle, manage mild hypothermia, or respond to altitude sickness long enough to organise evacuation?
At a minimum, every group should carry a compact but comprehensive first aid kit tailored to the trip length and environment. This includes dressings, blister treatments, pain relief, adhesive tape, triangular bandages, a small splint solution, and any personal medications such as asthma inhalers or altitude pills prescribed by a doctor. Just as important as the gear is the knowledge to use it: a basic wilderness first aid course teaches you to perform primary assessments, recognise red-flag symptoms, and improvise with limited resources. In the mountains, calm, systematic action often matters more than advanced equipment.
Communication is another vital component of emergency planning. In addition to satellite communicators where appropriate, carry a whistle (the international distress signal is six blasts repeated at intervals) and a powerful headlamp with spare batteries. If an incident occurs, your priorities are to prevent further harm, protect from the elements, and signal for help effectively. That might mean moving an injured person out of a rockfall zone, insulating them with extra clothing and an emergency bivy, and then carefully relaying your GPS coordinates and incident details to rescue services. The more clearly you can describe your location, weather, and patient condition, the faster and safer the response will be.
Legal requirements and permit acquisition for international mountain ranges
Crossing borders to climb or trek in iconic mountain ranges introduces a final, often overlooked layer of preparation: legal compliance and permits. Many high-demand areas regulate access to protect fragile environments and manage rescue and infrastructure costs. Popular trekking routes like the Everest Base Camp trail, the Inca Trail, or certain sectors of the Himalayas and Andes require trekking permits, park entry fees, or mandatory guide services. Failing to secure these documents can result in fines, denied access, or invalidated insurance coverage if an incident occurs.
Before booking flights, research the specific regulations for your chosen destination through official park websites, local guiding companies, or government tourism portals. You may need climbing permits for peaks above a certain height, restricted-area visas, or proof of rescue insurance with specified coverage amounts. In some countries, registering your itinerary with local authorities or mountain rescue organisations is mandatory, especially during peak seasons. Processing times for permits can range from same-day issuance to several weeks, so factor this into your planning timeline.
Travel insurance is another legal and practical safeguard that should not be treated as a box-ticking formality. Make sure your policy explicitly covers high-altitude trekking or mountaineering up to your planned maximum elevation, as standard policies often exclude activities above 3,000 or 4,000 metres. Check whether helicopter evacuation, medical repatriation, and trip interruption are included—these can be decisive in remote regions where rescue costs are substantial. By aligning your permits, insurance, and local legal requirements in advance, you remove bureaucratic obstacles and ensure that, if something does go wrong in the mountains, the systems designed to help you can operate without delay.
